greends-ipython
Introduction to Python 2025/2026
Masters in Data Science applied to agricultural and food sciences, environment, and forestry engineering.
Instructor: Manuel Campagnolo (mlc@isa.ulisboa.pt)
Teaching assistant: Mekaela Stevenson (mekaela@edu.ulisboa.pt)
Online resources for the course
- Required: CS50’s Introduction to Programming with Python: lectures (videos and notes), problems sets, shorts; The platform allows you to test your code at the CS50 codespace for the proposed problems (you need to have your own GitHub account to access the codespace).
- Required (you need to self-register using this link) Moodle (https://elearning.ulisboa.pt/course/view.php?id=11236): assignments; submissions; detailed grades and comments
- Fenix webpage for the course (https://fenix.isa.ulisboa.pt/courses/intpy-846413499991952): administrative information and final grades
- Learn Python with Scrimba, Olof Paulson: interactive lectures (videos), examples and exercises
- Introduction to Python (VScode): interactive step by step lectures and exercises, real-time quizzes.
- Basic concepts and features of the Python language and system: The Python Tutorial at python.org.
- Python Programming course at PP.fi: same features as CS50 but to test your solutions to problems you are required to pass previous tests
- If you curious about the story of Python, check out this video. In this video, you’ll learn about the output of
>>> import thisand many other anecdotes about Python.
Course contents: the course will cover some topics in CS50P and PP.fi
| CS50P | Contents | PP.fi | Contents |
|---|---|---|---|
| Lecture 0 | Creating Code with Python; Functions; Bugs; Strings and Parameters; Formatting Strings; More on Strings; Integers or int; Readability Wins; Float Basics; More on Floats; Def; Returning Values | Part 1 | Intro; I/O; More about variables; Arithmetic operations; Conditional statements |
| Lecture 1 | Conditionals, if Statements, Control FlowModulo; Creating Our Own Parity Function; Pythonic; match | Part 2 | Programming terminology; More conditionals; Combining conditions; Simple loops |
| Lecture 2 | Loops; While Loops; For Loops; Improving with User Input; More About Lists; Length; Dictionaries, More on code modularity | Part 3 | Loops with conditions; Working with strings; More loops; Defining functions |
| Part 4 | The Visual Studio Code editor, Python interpreter and built-in debugging tool; More functions; Lists; Definite iteration; Print statement formatting; More strings and lists | ||
| Part 5 | More lists; References; Dictionary; Tuple | ||
| Lecture 3 | Exceptions, Runtime Errors, try, else, Creating a Function to Get an Integer, pass | Part 6 | Reading files; Writing files; Handling errors; Local and global variables |
| Lecture 4 | Libraries, Random, Statistics, Command-Line Arguments, slice, Packages, APIs, Making Your Own Libraries | Part 7 | Modules; Randomness; Times and dates; Data processing; Creating your own modules; More Python features |
| Lecture 5 | Unit Tests; assert; pytest; Testing Strings; Organizing Tests into Folders | ||
| Lecture 6 | File I/O; open; with; CSV; Binary Files and PIL | ||
| Lecture 7 | Regular Expressions; Case Sensitivity; Cleaning Up User Input; Extracting User Input | ||
| Lecture 8 | Object-Oriented Programming; Classes; raise; Decorators; Class Methods; Static Methods; Inheritance; Inheritance and Exceptions; Operator Overloading | Part 8 | Objects and methods; Classes and objects; Defining classes; Defining methods; More examples of classes |
| Part 9 | Objects and references; Objects as attributes; Encapsulation; Scope of methods; Class attributes; More examples with classes | ||
| Part 10 | Class hierarchies; Access modifiers; Object oriented programming techniques; Developing a larger application | ||
| Lecture 9 | set; Global Variables; Constants; Type Hints; Docstrings; argparse; Unpacking; args and kwargs; map; List Comprehensions; filter; Dictionary Comprehensions; enumerate; Generators and Iterators | Part 11 | List comprehensions; More comprehensions; Recursion; More recursion examples |
| Part 12 | Functions as arguments; Generators; Functional programming; Regular expressions |
Class 1 (September 12, 2025): data types, variables, functions
- The recommendation for this class is to code in the CS50 cloud environment (VScode). Two steps: 1. log in into your github account; 2. access your code space at https://cs50.dev/. This environment allows you to test automatically your scripts for the CS50 problem sets.
- Some useful keyworks for the command line interface (CLI) in terminal:
code filename.pyto create a new filelsto list files in foldercp filename newfilenameto copy a file, e.g.cp ..\hello.py farewell.py(..represents parent folder)mv filename newfilenameto rename or move file, e.g.my farewell.py goodbye.pyormv farewell.py ..(move one folder up)rm filenameto delete (remove) filemkdir foldernameto create new foldercd foldernamechange directory, e.g.cd ..rmdir foldernameto delete folderclearto clear terminal window
- The REPL (interactive Read-Eval-Print-Loop) environment: see https://realpython.com/interacting-with-python/
- All values in Python have a type. The primitive data types are: integer, float, string, Boolean, and None (see https://www.geeksforgeeks.org/python/primitive-data-types-vs-non-primitive-data-types-in-python/)
- strings (
str), variables, print (a function), parameters (e.g.end=), input, comments, formatted strings (f"..."),.strip(),.title(methods) - integers (
int), operations for integers, casting (e.g.strtoint) - floating point values (
float), round, format floats (e.g.f"{z:.2f}) True,False,and,or,not
- strings (
- Functions,
def,return - Suggested problems: CS50 Problem set 0
Class 2 (September 19, 2025): conditionals, lists, dictionaries
- Conditionals:
if,elif,else:if score >= 70: print("Grade: C to A") elif score >= 60: print("Grade: D") else: print("Grade: F")match:match species: case 'versicolor': label=0 case 'virginica' label=1 case _: label=2
- Pythonic coding:
def main(), define other functions, callmain(). The code must be modular. - While loops, for loops,
break,breakandreturn - Data type list
[]: methodsappend,extend - Data type dictionary
{},items(), keys.key()and values.values()knights = {'gallahad': 'the pure', 'robin': 'the brave'} for k, v in knights.items(): print(k, v) if 'gallahad' in knights: print('Go Gallahad') - Collaborative project: each student or small group of students should define each necessary function to complete the script below. The side effect of
main()is a simple histogram printed in the terminal.def main(): # read and sort values x=read_values() # x is a list of numbers, either integers or floats n=len(x) # integer; number of values xmin,xmax=determine_min_max(x) # integers or floats # determine number of classes m=number_of_classes_sturges(n) # m is a positive integer such that 2**(m-1) <= n <= 2**m # determine class amplitude delta=amplitude(xmin,xmax,m) # positive float, the range of values divided by the number of classes # Compute frequency for each class and plot histogram row by row for i in range(m): left=xmin+i*delta if i < m-1: right=left+delta else: right=left+delta+1 # either 1 or any positive value freq=determine_frequency(x,left,right) # integer; note that each value must belong to one and only one class print_frequency(freq) # the output must be '****' where each * represents one observation # execute main main()One possible solution for the collaborative project: (https://github.com/isa-ulisboa/greends-ipython/edit/main/collaborative_project_session2.py)
- Suggested problems: CS50 Problem set 1. Do not forget about the assignment on Moodle: problems File extensions, Coke machine, Plates
Class 3 (September 26, 2025): exercises, list and dictionary comprehensions, best practices
-
Exercises on list comprehension (with some solutions): https://github.com/isa-ulisboa/greends-ipython/blob/main/exercises_list_comprehension.md
-
Exercises on dictionary comprehension (with some solutions): https://github.com/isa-ulisboa/greends-ipython/blob/main/exercises_dict_comprehension.md
-
Exercises from CS50 Problem set 0, 1 and 2.
Class 4 (October 3, 2025): handling exceptions in Python: catching and raising exceptions
See lecture https://cs50.harvard.edu/python/weeks/3/
- A few examples of code that can be helpful to solve problems in CS50 Problem set 3.
Example of basic use of try-except to catch a ValueError:
try:
    x = int(input("What's x?"))
except ValueError:
    print("x is not an integer")
else:
    print(f"x is {x}")
Function for requesting an integer from the user until no exceptions are caught:
def get_int():
    while True:
        try:
            x = int(input("What's x?"))
        except ValueError:
            print("x is not an integer")
        else:
            break
    return x
For a list of Python Built-in Exceptions, besides ValueError, you can check https://www.w3schools.com/python/python_ref_exceptions.asp
- The fuel gauge problem (https://cs50.harvard.edu/python/2022/psets/3/fuel/)
To solve this problem, try to organize your code as follows. As suggested in hints, you should catch ValueError and ZeroDivisionError exceptions in your code. In the code below, the user is being asked for correct values for x,y until they satisfy the requirements: x,y must be inputted as a string x/y, x has to be less or equal to y, and y cannot be zero. The function get_string_of_integers_X_less_than_Y in the code below should take care of that.
def main():
    # asks user for input until the input is as expected
    x,y=get_string_of_integers_X_less_than_Y()
    # compute percentage from two integers
    p=compute_percentage(x,y)
    # print output
    print_gauge(p)
- Example from (https://cs50.harvard.edu/python/2022/shorts/handling_exceptions/).
Exercise: adapt the code proposed in the short to be more modular, where the main function is something like the one below:
def main():
    spacecraft = input("Enter a spacecraft: ")
    au=get_au(spacecraft)
    m = convert(au)
    print(f"{m} m")
- Other useful applications of try-except
- We may want to exit the execution of our script if some exception is caught. This can be done with
sys.exit(), which can also be used to print a message.import sys # import module try: x = int(input("What's x?")) except ValueError: sys.exit("x is not an integer") - Example of code that catches
CRTL-CorCRTL-D:
while True:
    try:
        x=int(input())
    except ValueError:
        print('x is not integer')
    except KeyboardInterrupt: #CTRL-C (in Linux, interrupt execution)
        print('\n KeyboardInterrupt')
        break
    except EOFError: #CTRL-D (in Linux, log out terminal/end-of-file)
        print('\n EOFError')
        break
    else:
        print(x)
Exercise (Asking for an haphazard list of numbers): Create a program that asks the user to provide haphazardly a series of numbers that you want to store in a list. The user is asked for a number at the time. Only inputs that are numbers are stored in the list. When the user wants to stop, it should type CTRL-D. Then, the program should print the list of numbers.
Class 5 (October 10, 2025): modules, packages, APIs
See lecture https://cs50.harvard.edu/python/weeks/4/
Modules
Suggestion: watch https://cs50.harvard.edu/python/shorts/creating_modules_packages/
Modules are just python scripts (files like module_name.py) which can be imported into your main code. You can import everything that belongs to the module, or just some given function(s) or other objects.
Create and import your own module
Exercise: Create file named mymodule.py and file main.py in http://cs50.dev. Organize the files in the following folders:
|--- class_5 # or whatever folder name you wish
     |--- modules
          |--- mymodule.py
     |--- main.py
The contents of mymodule.py are typically functions or constants that you can re-use in different contexts. Let’s suppose that mymodule.py has the following contents.
mymodule.py
import sys

Constants={
    'e'   : 2.718281828459045, # Euler's constant
    'pi'  : 3.141592653589793, # Archimedes' constant
    'phi' : 1.618033988749895  # Golden ratio
}

def get_integer() -> int:
    #get integer from user
    while True:
        try:
            return(int(input('Type a number:  ')))
        except ValueError:
            print('Not an integer number: try again')
        except KeyboardInterrupt: #CTRL-C
            print('\n If you want to exit type CTRL-D')
        except EOFError: # CTRL-D
            sys.exit('\n Exit as requested')

def simplify(s: str) -> str:
    #Remove whitespaces from string and convert to lowercase
    return s.strip().lower()
and main.py is the following file:
main.py (1st version)
import modules.mymodule

def main():
    x=modules.mymodule.get_integer()
    print(x)

main()
If you prefer, you can explicitly import some given functions from the module as in the following example.
main.py (2nd version)
from  modules.mymodule import get_integer

def main():
    x=get_integer()
    print(x)

main()
You can also import everything from the module with from modules.mymodule import * instead of the more specific (and recommended) from modules.mymodule import get_integer.
The examples above follow the directory tree that was suggested. If you change the module’s location, you need to adapt he code accordingly. In alternative, you can add the path to the directories where your modules lies to sys.path as in the following example.
import sys
sys.path.append(r'path-to-folder') # folder where mymodule is (e.g. `/workspaces/8834091`)
import mymodule
As explained on the recommended video, a python package is just a folder with modules and a special file named __init__.py
Pip install
Often, you import a module that is available at https://pypi.org/project/pip/. Say you want to load the module random which provides a series of functions for sampling, shuffling, and extracting random numbers from a variety of probability distributions. If the module is not already available, you can typically load it in your terminal with
$pip install random
and then import it on your main script with import random. If you want to know which is the folder where the module is located, you can get that information with random.__file__ as in the following script.
import random
print(random.__file__)
Suggestion: write a script to estimate the value of $\pi$ with a Monte Carlo algorithm that makes calls to random.uniform(-1, 1). One possible solution: https://www.geeksforgeeks.org/dsa/estimating-value-pi-using-monte-carlo/
sys.argv
Previously, we used module sys, in particular functions sys.exit() and sys.path. Another useful function is sys.argv, that allows you to have access to what the user typed in at the command line $ as in the following script.
import sys
print(len(sys.argv)) # returns the number of words in the command line after $python
print(sys.argv[1]) # returns the 2nd word, i.e., the first word after $python myscript.py
For instance, the following script named sum.py prints the sum of two numbers that were specified in the command line.
# sum.py
import sys
try:
    x,y = float(sys.argv[1]), float(sys.argv[2])
    print('the sum is',x+y)
except IndexError:
    print('missing argument')
except ValueError:
    print('The arguments are not numbers')
To run it, you can for instance execute the command $python sum.py 1.2 4.3 in the terminal.
APIs
Suggestion: watch https://cs50.harvard.edu/python/shorts/api_calls/ (13’)
Application program interfaces allow you to communicate with a remote server. For instance, requests is a package that allows your program to behave as a web browser would. Consider the following script myrequest.py that allows you to explore the itunes database (https://performance-partners.apple.com/search-api):
Example: iTunes
import requests
import sys
try:
    response = requests.get("https://itunes.apple.com/search?entity=song&limit=1&term=" + sys.argv[1])
    print(response.json())
except IndexError:
    sys.exit('Missing argument')
except requests.RequestException:
   sys.exit('Request failed')
You can then call the API from your terminal with $python myrequest.py 'name of my favorite band'.
Example: GBIF
You can easily adapt that code to access a different database. For instance if you want to explore the GBIF database (https://data-blog.gbif.org/post/gbif-api-beginners-guide/), you can just replace the main line of code in myrequest.py with
response=requests.get('https://api.gbif.org/v1/species/match?name='+ sys.argv[1])
and execute it with, say, $python myrequest.py Tracheophyta in the terminal.
Example: open-meteo
Another example of a useful API for weather data is https://open-meteo.com/en/docs#api_documentation. You can find a customized requests package for open-meteo at https://pypi.org/project/openmeteo-requests/.
Problems
Solve problems from CS50P Problem_set_4. In particular, for problem Bitcoin price index organize your code so the main function is the following:
def main():
    x=read_command_line_input()
    price=get_bitcoin_price()
    print(f"${x*price:,.4f}")
Class 6 (October 17, 2025): virtual environments; file I/O
- For virtual environments, look at How to Use Virtual Environments with the Built-In venv Module (17’)
- UV: UV - A Faster, All-in-One Package Manager to Replace Pip and Venv
- For file I/O, you can follow https://cs50.harvard.edu/python/weeks/6/.
- Used to contain a specific Python interpreter and software libraries and binaries which are needed to support a project (library or application). These are by default isolated from software in other virtual environments and Python interpreters and libraries installed in the operating system.
- Contained in a directory, conventionally named
.venvorvenvin the project directory, or under a container directory for many virtual environments. - Not checked into source control systems such as Git. - Considered as disposable – it should be simple to delete and recreate it from scratch. You don’t place any project code in the environment. - Not considered as movable or copyable – you just recreate the same environment in the target location. -
One can first create (with
mkdir) a folder called, say,myprojectthat contains our project. -
Then create a subfolder
.venvfor the virtual environment(s). This folder should be separated from the working folders that contain data and scripts. - The virtual environment
myprojectcan then be created with:.venv/ $ python3 -m venv myprojectvenv # creates environment called 'myprojectvenv' with Python 3In case one needs to delete the virtual environment, one just needs to delete the folder. This can be done with
.venv/ $ sudo rm -rf myprojectvenvin the terminal (Linux). - After the virtual environment has been created, one needs to activate it. In Linux, this is done by executing
activatewhich lies in thebinfolder of the virtual environment: - With the environment activated, let’s try to install a few packages, specifying the versions. For instance, install the following packages.
-
To list all instaled packages within the environment
myprojectvenvone can execute(myprojectvenv) $ pip listas before. Compare the version ofrequestsinmyprojectvenvwith the version returned initially in the base environment: this one is 2.25.0 while the one in the base environment is more recent. One can also check whererequestsis installed inmyprojectvenvwith the command(myprojectvenv) $ pip show requests. - Check the system path (where Python will look for installed packages) by executing
print(sys.path): one can do this from the terminal with the command(myprojectvenv) .venv/ $ python -c 'import sys; print(sys.path)'Notice that the folder in
myprojectvenvwhere the virtual environment packages are installed is listed, but the path to where base packages are stored is not. - If one wishes to share a virtual environment, the way to do that is to share a file (typically,
requirements.txt) that allows a collaborator to re-create the environment. The filerequirements.txtstores the information about the installed packages in a file in case one intends to share the environment (e.g. in GitHub). Towards that end, one needs to createrequirements.txtwith the packages names and versions, that can be used to create a clone of the environment on another machine. This is done, still withinmyprojectvenv(i.e. withmyprojectvenvactivated) with the following command:(myprojectvenv) .venv/ $ pip freeze > requirements.txtNote that the file
requirements.txtis created in the folder that containsmyprojectvenvand not withinmyprojectvenvitself: this makes sense, since one does not want to store scripts or data withinmyprojectvenvbut just packages and the Python installation. - Since
requirements.txtis now available, one can create a copy ofmyprojectvenvcalled, say,myprojectvenv2. Firstly, one needs to de-activatemyprojectvenvwith$ deactivate. Then, the commands to be executed in the terminal are:.venv/ $ python3 - m venv myproject2venv # create new virtual environment .venv/ $ source myproject2venv/bin/activate # activate myproject2venv (myproject2venv) .venv/ $ pip install -r requirements.txt # install packages and versions listed in requirements.txtExercise: go back to
myprojectvenv, add package (say,emoji==0.1.0), re-buildrequirements.txt, and create new environmentmyproject3venvand install the set of packages listed in the newrequirements.txt.
Virtual environments in Python
A virtual environment (https://docs.python.org/3/library/venv.html) is:
In your system you have the base environment by default, and you can create one or more virtual environments. Below, we describe how to create a virtual environment and how to activate it in Python, so your commands at the terminal are interpreted within that environment. That allows you to encapsulate in each virtual environment you create a given Python version, and a set of Python packages with their given versions.
Your data and script files remain on the usual working folders: they should not be moved to the folders where the virtual environment files are stored.
The following commands work in the CS50 codespace that runs Linux (check with $cat /etc/os-release in the terminal). Some need to be slightly adapted for Windows (check differences for instance at https://realpython.com/python-virtual-environments-a-primer/).
Firstly, let’s check what are the available packages and their versions in the base environment, and also let’s get extra information about the package requests (e.g. dependencies):
$ pip list
$ pip show requests
Next, let’s create a virtual environment.
.venv/ $ source myprojectvenv/bin/activate # note that activate needs to be sourced
As a result, the prompt shows (myprojectvenv) .venv/ $ which indicates that myprojectvenv is now activated. One can check the Python version with $python -V. To de-activate a virtual environment, the command is $ deactivate.
(myprojectvenv) .venv/ $ pip install random11==0.0.1
(myprojectvenv) .venv/ $ pip install geopy==1.23.0
(myprojectvenv) .venv/ $ pip install requests==2.25.0
Some of this packages depend on additional packages that are installed automatically.
File I/O
As discussed in (https://cs50.harvard.edu/python/2022/notes/6/) open is a functionality built into Python that allows you to open a file and utilize it in your program. The open function allows you to open a file such that you can read from it or write to it. The most basic way to use open allow us to enable file I/O with respect to a given file. In the example below, w is the argument value that indicates that the file is open in writing mode. The instruction file.write(...) will entirely rewrite the file, deleting the previous contents.
name='Bob'
file = open("names.txt", "w")
file.write(name)
file.close()
As an alternative, if the goal is to add new contents to the file, which is appended to the existent content, then w should be replaced by a (append). Each call to file.write(name) will then add the value of name to the end of file.
Instead of explicitly opening and closing a file, it’s simpler to use the so-called context manager in Python, using the keyword with, which automatically closes the file:
with open("names.txt", "w") as f:
  f.write(name)
If one wishes to read from a file, then the file has to be opened in reading mode as in the following example. The method readlines reads all lines of the file, and stores them in a list, where each element of the list is the contents of the corresponding line.
with open("names.txt", "r") as f:
  L=f.readlines(name)
However, it is possible to read one line at the time:
with open('myfile.txt','r') as f:
    N=0
    for line in f:
        N+=1
print('number of lines', N)
A file can be of type text (human-readable) or binary. Binary files like images for instance are read with with open('myfile.txt','rb') as f.
Exercise: Consider the file https://github.com/isa-ulisboa/greends-ipython/blob/main/INE_permanent_crops.csv downloaded from the Portuguese Institute of Statistics, INE, about the area of two permanent crops (olive plantations, vineyard) for the main regions of Portugal. The data is not structured as a rectangular table: specifically it contains rows that we want to ignore. We are just interested in filtering the rows that have the same number of separators, namely the column names and the rows that contain the crop areas for each region. The resulting rectangular table is to be exported to a new file.
Write the code using the template below.
def main():
    # constants
    input_file='INE_permanent_crops.csv'
    output_file='output.csv'
    sep=';'
    number_sep=6
    file_encoding='ISO-8859-1'
    # main steps
    L=read_file(input_file,file_encoding) # L is a list of the rows of the file
    L=filter_lines(L,sep,number_sep) # L is a list of lists, after we apply the separator
    write_to_csv(L,output_file,sep)
You should complete the definitions of the following functions.
def read_file(file_name,file_encoding):
    ''' reads file using the appropriate encoding and returns list of rows'''
    with open(file_name,"r", encoding=file_encoding) as f:
        lines=f.readlines()
    return lines

def filter_lines(L,sep,number_sep):
    '''
    Filter only elements of L that contains number_sep times the separator 'sep'.
    Each filtered element of L is represented as a list of strings, the strings separated by 'sep'
    All list of strings have the same length (number_sep+1)
    The output is the list with just the filtered lists of strings
    '''
    newL=[]
    for line in L:
        row=line.rstrip().split(sep)
        ...
    return newL

  def write_to_csv(L, output_file,sep):
    '''writes each element of L as a line in the output file'''
    with open(output_file, "w") as f:
        for row in L:
           ...
  main()
Class 7 (October 24, 2025): Jupyter notebooks, tabular data; pandas
-
Tutorial: https://pandas.pydata.org/docs/getting_started/intro_tutorials/index.html
-
Video sugestions:
- Overview by Rob Mulla: Learning Pandas for Data Analysis? Start Here. (22’)
- Course by Corey Schafer: Pandas tutorial (11 videos)
Create a Pandas DataFrame from scratch
Pandas dataframes have an intrinsic tabular structure represented by rows and columns where each row and column has a unique label (name) and position number inside the dataframe. The row labels, called dataframe indices, can be integer numbers or string values. The column labels, called column names, are usually strings. Use the following script to create a dataframe from a dictionary. Notice the terminology for rows (index) and columns (columns).
import pandas as pd
data = {'Product': ['a', 'b', 'c', 'd', 'e', 'f'],
        'Price': [10, 25, 15, 30, 20, 35],
        'Quantity': [100, 50, 75, 30, 90, 20],
        'Sales': [1000, 1250, 1125, 900, 1800, 700]}
df = pd.DataFrame(data)
df = df.set_index('Product')
display(df)
DataFrame and Series Basics - Selecting Rows and Columns
- Print the column names of
dfwithdf.columns. Note:.columnsreturns apd.Indexobject. This is to provide extra functionality and performance compared to lists. To extract a list of names, one can usedf.columns.to_list(). To get an array, usedf.columns.values. - Select columns:
- Create a
Seriesobject that corresponds to columnPricewithdf['Price'] - Create a new dataframe object that corresponds to columns
PriceandQuantitywithdf[['Price','Quantity']].
- Create a
- Select rows with boolean indexing:
- Create a new dataframe with only products with sales above 80 with
display(df[df['Sales'] > 1000])
- Create a new dataframe with only products with sales above 80 with
- Select rows and columns with
iloc(positional indexing):# Select the first row by integer position display(df.iloc[0]) # Select the first two rows and all columns by integer position display(df.iloc[0:2, :]) # Select rows from index 1 to 3 (inclusive of 1, exclusive of 4) # and columns from index 0 to 2 (exclusive of 2) by integer position display(df.iloc[1:4, 0:2]) # Select a specific cell by integer position (row index 2, column index 1) display(df.iloc[2, 1]) - Select rows and columns with
loc(label-based indexing):# Select a single row by its label display(df.loc['a']) # Select multiple rows by their labels display(df.loc[['a', 'c', 'e']]) # Select rows by label and specific columns by label display(df.loc[['a', 'c', 'e'], ['Price', 'Sales']]) # Select a slice of rows by label (inclusive of both start and stop labels) display(df.loc['b':'e']) # Select rows by label slice and columns by label slice display(df.loc['b':'e', 'Quantity':'Sales'])
Read csv file
Consider the dataset that described 517 fires from the Montesinho natural park in Portugal. For each incident weekday, month, coordinates, and the burnt area are recorded, as well as several meteorological data such as rain, temperature, humidity, and wind (https://www.kaggle.com/datasets/vikasukani/forest-firearea-datasets). For reference, a copy of the file is available forestfires.csv. The variables are:
- X - x-axis spatial coordinate within the Montesinho park map: 1 to 9
- Y - y-axis spatial coordinate within the Montesinho park map: 2 to 9
- month - month of the year: “Jan” to “dec”
- day - day of the week: “mon” to “sun”
- FFMC - FFMC index from the FWI system: 18.7 to 96.20
- DMC - DMC index from the FWI system: 1.1 to 291.3
- DC - DC index from the FWI system: 7.9 to 860.6
- ISI - ISI index from the FWI system: 0.0 to 56.10
- temp - the temperature in Celsius degrees: 2.2 to 33.30
- RH - relative humidity in %: 15.0 to 100
- wind - wind speed in km/h: 0.40 to 9.40
- rain - outside rain in mm/m2 : 0.0 to 6.4
- area - the burned area of the forest (in ha): 0.00 to 1090.84
Explore the dataset with Pandas
- Read the file with
pd.read_csvinto a new objectfires, and show the first 10 rows withfires.head(10). - Create list of column names and determine column data types with attribute
.dtypes. - Print a summary of the dataframe with
.info(). - Create a
Serieswith the temperature values for all 517 fires. - Create a
DataFramejust with columnsmonthandday. - Select fires for which the temperature is higher than 25 Celsius, and between 20 and 25 Celsius; note that each condition needs to be surrounded by
(...)and can be connected with&or|or negated with~. - Select fires that occured on weekends; use the conditional function
.isin() - Check if there are no
Nullvalues in the dataframe with.notna(). You can sum along columns with.sum(). - Use
ilocto select the first 20 fires and just the FWI based variables values. - Use
locandis.in()to select fires from August and September and just FWI based variables values for those fires. - Create a dataframe
months_dffrom a dictionary: for instance create a dictionary where keys arejan,feb,mar, for all 12 months, and the values areJanuary,February,Marchand so on.month_data = { 'Month': [ 'January', 'February', 'March', 'April', 'May', 'June', 'July', 'August', 'September', 'October', 'November', 'December' ], 'mth': [ 'jan', 'feb', 'mar', 'apr', 'may', 'jun', 'jul', 'aug', 'sep', 'oct', 'nov', 'dec' ] } months_df = pd.DataFrame(month_data) - Merge with new dataframe to get a new variable that contains the full name of the month. See (https://pandas.pydata.org/docs/user_guide/merging.html)
merged_df = pd.merge(fires, months_df, left_on='month', right_on='mth', how='left') merged_df.drop(columns='mth', inplace=True) - Create a dataframe named
firesbymonthwith columnsavg_temp(average temperature for fires in that month),avg_RH(idem, for humidity) andfire_count(number of fires). Towards that end, reduce thefiresdataframe with method.groupbyto get just one row per month, and average temperature, average RH, and number of fires per month. See (https://pandas.pydata.org/docs/user_guide/groupby.html) - What is the effect of adding the method
.reset_index()to the previous command? - Sort the dataframe
firesbymonth, such that the 12 rows are ordered by month correctly:jan,feb,mar, and so on. - Create a new column called
conditionsinfiresbymonthof type string that indicates if a month isdry&hot,dry&cold,wet&hotorwet&cold. Use the mean values ofavg_tempandavg_RHto establish the appropriate thresholds. Use method.applyand define the function to apply withlambda. - Re-organize the information in
firesinto a two-way table that shows the total area of fires per day of the week and per month, whereNaNare replaced by 0. Towards that end, explore the.pivot_tablemethod.
Combining positional and label-based indexing
There are several possibilities to combine positional and label-based indexing:
- (with
iloc) Usingdf.columns.get_loc()which converts the name of one column into its position. Theniloccan be used to perform the selection. For multiple columns determined by a list of column names, one can use insteaddf.columns.get_indexer(). Example: Useilocto select the first 20 fires and just the FWI based variables values, using the names rather than the positions of those variables. Solution:FWI_positions=fires.columns.get_indexer(['FFMC','DMC','DC','ISI'])and ` fires.iloc[0:20,FWI_positions]` - (with
loc) Usingdf.index[]to extract the index names. Then,loccan be used to perform the selection. Solution:fires.loc[fires.index[0:20], ['FFMC', 'DMC', 'DC', 'ISI']].
Exporting to file
Exporting is done with operations named .to_... as listed in (https://pandas.pydata.org/docs/user_guide/io.html)
- Export your file as an Excel spreadsheet with
.to_excel("filename.xlsx", sheetname="fires", index=False) - Read an Excel spreadsheet with:
pd.read_excel("filename.xlsx", sheetname="fires", index=False)
Class 8 (November 7, 2025): Pandas
Exercises with Pandas. Continued from last class
Class 9 (November 15, 2025): OOP, classes, methods, attributes
Suggestions:
- CS50P: Object-Oriented Programming.
- Self contained Python Object Oriented Programming (OOP) - For Beginners (53’). This beginner-friendly Python tutorial explains object-oriented programming (OOP) concepts. It covers classes and objects, demonstrating how to create custom objects using classes. Learn about methods, attributes, and inheritance.
Suppose that one wants write a script in python using classes to monitor plants at a nursery. Initially plants grow from seeds in trays and one wants to keep track of the trays and number of plants per tray. All plants in a given tray are from the same species. Plants can be removed or added to the tray. One wants to track the plants of each species that are in the nursery.
For this type of problem, one wants to mimic entities of the real world (plants, trays, nursery) as objects in Python code. Object-oriented programming is an intuitive form of doing so. A class in Python is an object constructor, or a blueprint for creating objects.
The simplest example of class, with very little functionality, is a class to store constant values, which are not supposed to change. When one calls the class Constants defined below, an instance of the class with the two properties MAX_PLANTS_PER_TRAY and SALE_PRICE is created.
class Constants:
   MAX_PLANTS_PER_TRAY=50
   SALE_PRICE=5

print(Constants.SALE_PRICE)
However, in general we intent to call the class to create one instance (one object) of the class and set the attributes of that object. To indicate the values of the instance attributes we use the __init__ method:
class Tray:
  def __init__(self,species, number_of_plants=12):
     self.species=species
     self.number_of_plants=number_of_plants

tray=Tray('Pansy')
print(f"the tray has {tray.number_of_plants} {tray.species} plants")
A class can have instance methods, which are functions defined for objects of the class. In the example, Tray is a class with attributes species and number_of_plants, and we want to create methods remove_plants and add_plants. We can think of this as an action performed on the specific instance of the class.
class Tray:
  def __init__(self,species, number_of_plants=12):
     self.species=species
     self.number_of_plants=number_of_plants
  # method to remove plants from tray
  def remove_plants(self, N):
      # check if N plants can be removed
      if N > self.number_of_plants:
          self.number_of_plants=0
      else:
          self.number_of_plants -= N
  # method to add plants to tray
  def add_plants(self, N):
      # check how many plants can be added
      if self.number_of_plants + N > Constants.MAX_PLANTS_PER_TRAY:
          self.number_of_plants = Constants.MAX_PLANTS_PER_TRAY
      else:
          self.number_of_plants += N
To test this try the following instructions, which you can think of as a sequence of actions: create tray, add or remove plants, and so on.
tray1=Tray('Pansy', 26)
tray2=Tray('Petunia', 28)
tray1.add_plants(10)
tray2.remove_plants(5)
print(f"tray1 has {tray1.number_of_plants} {tray1.species} plants")
print(f"tray2 has {tray2.number_of_plants} {tray2.species} plants")
Note that we don’t have an adequate print method for this class. This can be fixed by adding the method __str__ to the class. You can adapt the following code and include it into the Tray class.
def __str__(self):
    return f"This tray contains {self.number_of_plants} {self.species} plants"
Exercise:
If you want to have a better control on all the plants in the nursery, you might want to create a new class called, say, Inventory. An instance of that class will represent your nursery, which contains trays (objects from class Tray above), with plants from different species. Class Inventory could have, for instance, the following attributes and methods:
trays, an attribute which is a dictionary to store trays, with tray names as keysadd_tray, a method that adds a tray object to the inventory, and gives it a nameremove_tray, a method to remove a tray, identified by its nameget_tray, a method to retrieve a tray, identified by its name. This allows to obtain atrayobject, so you can add or remove plants to it.list_all_trays, a method to list the current state of the inventory.
Suggestion of solution:
class Inventory:
  def __init__(self,nursery_name,list_of_trays=[]):
    self.nursery_name=nursery_name
    self.list_of_trays=list_of_trays
  def add_tray(self,tray):
    self.list_of_trays.append(tray)
  def __str__(self):
    return f"This inventory contains {len(self.list_of_trays)} trays"
  def get_tray(self,index):
    return self.list_of_trays[index]
Try:
my_inventory=Inventory("my_nursery")
tray1=Tray('Pansy',25)
tray2=Tray('Pansy',32)
tray3=Tray('Petunia',10)
tray4=Tray('Petunia',25)
my_inventory.add_tray(tray1)
my_inventory.add_tray(tray2)
my_inventory.add_tray(tray3)
my_inventory.add_tray(tray4)
tray=my_inventory.get_tray(2)
tray.add_plants(10)
print(tray)
Class 10 (November 21, 2025): Main concepts of OOP; Unit tests
Main concepts of OOP

The four main concepts of Object-Oriented Programming (OOP) are Encapsulation, Abstraction, Inheritance, and Polymorphism. These concepts work together to create modular, scalable, and maintainable code in object-oriented programming.
This is a central topic in computer science, and therefore you can find all kind of resources about it. Among them, you can find simple descriptions of those concepts, with examples, at the following links:
- (https://www.programiz.com/python-programming/object-oriented-programming)
- (https://www.freecodecamp.org/news/object-oriented-programming-in-python/)
- (https://www.w3schools.com/python/python_inheritance.asp), (https://www.w3schools.com/python/python_polymorphism.asp)
Building on the plant nursery example of last class, the following scripts illustrate the implementation of those concepts:
Note that it is easy to abuse of classes in Python, which can make your code difficult to manage. Check the following video on Avoid These BAD Practices in Python OOP about Learn why you should replace unnecessary classes with functions, use modules instead of classes with only static methods, and flatten deep inheritance hierarchies.
Unit tests
This topic corresponds to Section 5 of the CS50 course: you can find the necessary resources on that link. In particular, see the short https://cs50.harvard.edu/python/2022/shorts/pytest/.
The idea is to create functions in Python (the names of those functions start with test_) that are used to test existing functions or classes in the script. To execute the test functions we call pytest in the terminal https://docs.pytest.org/ instead of python:
$ pytest - v # -v is optional for a more verbose output
If no arguments are given, pytest will execute all functions which name starts with test_ or end with _test in scripts in the current directory and all its subdirectories. However, $pytest my_file.py will only execute the tests within that file. Moreover, $pytest my_directory will only execute the tests defined in files located in that directory. There are further options to select the tests to be executed with pytest.
Simple example of a class and tests for that class
Consider you have two python modules: one with the definition of a class and the other that implement tests over that class.
# farm_carbon_footprint.py

import math

class Farm:
    def __init__(self, name, area_hectares):
        """Initialize the farm with a name and area in hectares."""
        self.name = name
        self.area_hectares = area_hectares
        self.activities = []

    def add_activity(self, activity, emissions_per_unit, units):
        """Add an activity with emissions in kg CO2e per unit and units."""
        self.activities.append((activity, emissions_per_unit, units))

    def total_emissions(self):
        """Calculate total carbon emissions from all activities."""
        return sum(emissions_per_unit * units for _, emissions_per_unit, units in self.activities)

    def emissions_per_hectare(self):
        """Calculate carbon emissions per hectare."""
        if self.area_hectares == 0:
            raise ValueError("Farm area cannot be zero.")
        return self.total_emissions() / self.area_hectares

    def radius_circle_with_farm_area(self):
        """ Calculate the radius (in meters) of a circle that has the same area as the farm"""
        return(math.sqrt(self.area_hectares/3.1459)*100)
and
# test_farm_carbon_footprint.py

import pytest
from farm_carbon_footprint import Farm

def test_add_activity():
    farm = Farm("Green Pastures", 10)
    farm.add_activity("Tractor Usage", 50, 5)  # 50 kg CO2e per hour, 5 hours
    farm.add_activity("Fertilizer Use", 10, 20)  # 10 kg CO2e per kg, 20 kg
    assert len(farm.activities) == 2

def test_total_emissions():
    farm = Farm("Green Pastures", 10)
    farm.add_activity("Tractor Usage", 50, 5)  # 50 kg CO2e per hour, 5 hours
    farm.add_activity("Fertilizer Use", 10, 20)  # 10 kg CO2e per kg, 20 kg
    assert farm.total_emissions() == 450  # 250 + 200

def test_emissions_per_hectare():
    farm = Farm("Green Pastures", 10)
    farm.add_activity("Tractor Usage", 50, 5)  # 50 kg CO2e per hour, 5 hours
    farm.add_activity("Fertilizer Use", 10, 20)  # 10 kg CO2e per kg, 20 kg
    assert farm.emissions_per_hectare() == 45  # 450 total / 10 hectares

def test_emissions_per_hectare_zero_area():
    farm = Farm("Tiny Farm", 0)
    farm.add_activity("Tractor Usage", 50, 2)  # 50 kg CO2e per hour, 2 hours
    with pytest.raises(ValueError, match="Farm area cannot be zero."): # match is optional: it matches Value Error message in emissions_per_hectare()
        farm.emissions_per_hectare()

def test_radius_of_circle_with_farm_area():
    farm = Farm("Circle Farm", 1)
    assert farm.radius_circle_with_farm_area() == pytest.approx(56.38, abs=0.1)
    farm = Farm("Circle Farm", 10)
    assert farm.radius_circle_with_farm_area() == pytest.approx(178.3, abs=0.01)
Exercise: Adapt the Farm class definition and test_farm_carbon_footprint.py in order to:
- Add a method
.number_of_activities()to classFarmthat returns the number of activities. Check the correctness of that method with a new test intest_farm_carbon_footprint.py. - Adapt the
Farmclass soValueErrorshould be raised if the propertyarea_hectaresis negative when you try to create an instance ofFarm. Check with a new test intest_farm_carbon_footprint.pythat the behavior of the class is as expected whenarea_hectaresis negative.
Assignment: Cookie jar problem described at (https://cs50.harvard.edu/python/psets/8/jar/). Create a script for the problem and test it with check50 cs50/problems/2022/python/jar.
Class 11 (November 28, 2025): Exercises
The class was used to revise previous topics and work on exercises, including assignment #4.
Class 12 (December 5, 2025): Packing/unpacking, args and kwargs, map, filter, lambda
The packing/unpacking operators * and **
The packing/unpacking operators allows us to deal with structures of variable length. The example below illustrates packing several numbers into a list.
x=[1,2,3,4,5,6,7,8,9]
a,*b,c=x # b is the list [2,3,4,5,6,7,8]
print(a,b,c)
The same operator can be used to unpack:
list1=[1,2,3]
list2=[6,7,8]
new_list=[*list1,4,5,*list2] # values are unpacked
print(new_list)
The * and ** operator are mostly used as arguments of functions that can accept a variable number of arguments (like function print): the operator * allows to pack all positional arguments into a tuple and the operator ** allows to pack all named arguments into a dictionary. In the example below, the args refers to positional arguments and kwargs refers to keyword arguments (i.e named arguments) . Note that one can have a combination of regular arguments, regular named arguments, *args, and **kwargs as arguments of a function, as long as keyword arguments follow positional arguments (if you try to switch the order, Python raises a SyntaxError).
def pack(*args, **kwargs):
    return args,kwargs

x,y=pack(1,2,10, num_years=10,rate=0.03)

print('Positional arguments are packed into tuple',x)
print('Named arguments are packed into dictionary',y)
Exercises on *args* and *kwargs*
Summing Arguments with *args
Write a function sum_all that takes any number of positional arguments and returns their sum.
def sum_all(*args):
    print(args)
    pass  # Your code here

# Example usage:
print(sum_all(1, 2, 3))       # Output: 6
print(sum_all(10, 20, 30, 5))  # Output: 65
Concatenate Strings with *args
Create a function concat_strings that takes any number of string arguments using *args and concatenates them into a single string.
def concat_strings(*args):
    pass  # Your code here

# Example usage:
print(concat_strings("Hello", " ", "world", "!"))  # Output: "Hello world!"
print(concat_strings("Python", " is", " fun!"))    # Output: "Python is fun!"
Handling Default Keyword Arguments with **kwargs
Write a function greet that accepts a keyword argument name (default value: "Guest") and an optional keyword argument greeting (default value: "Hello"). Return the formatted greeting message. Hint: consider the method get for dictionaries: get(key,default) allows to set a default value if the key is not present.
def greet(**kwargs):
    pass  # Your code here

# Example usage:
print(greet(name="Alice", greeting="Hi"))  # Output: "Hi Alice"
print(greet(name="Bob"))                   # Output: "Hello Bob"
print(greet())                             # Output: "Hello Guest"
Combine *args and **kwargs in a descriptive string
Write a function describe_person that takes positional arguments (*args) for hobbies and keyword arguments (**kwargs) for personal details (e.g., name, age). Return a formatted string describing the person.
def describe_person(*args, **kwargs):
    pass  # Your code here

# Example usage:
print(describe_person("reading", "traveling", name="Alice", age=30))
# Output: "Alice (30 years old) enjoys reading, traveling."
Filter Keyword Arguments with **kwargs
Create a function filter_kwargs that takes any number of keyword arguments and returns a new dictionary containing only those with values greater than 10.
def filter_kwargs(**kwargs):
    pass  # Your code here

# Example usage:
print(filter_kwargs(a=5, b=15, c=20, d=3))  # Output: {'b': 15, 'c': 20}
Combine *args for values and **kwargs for parameters
Suppose you borrowed several amounts and you want to compute the accumulated interest over a certain number of years. Create code that is going to use the positional arguments of the function main below as the amounts, num_years as the loan duration, and rateas the annual interest rate.
# your code

if __name__=='__main__':
    main(1,2,10,5,4,num_years=10, rate=0.05)
List and dictionary comprehension, map, filter and lambda
Suppose one wants to create a list with all the cubes of even numbers up to N. The following scripts show how this can be done with different operators that replace the traditional loop structure: list comprehension, filter, map and lambda
Operator map applies a given function to each element of a list. Likewise, filter applies a boolean function to filter elements of a list. Both function can be executed in parallel over the elements of the list since each output is independent of the outputs for the remainder elements of the list.
- With list comprehension:
def cube(x): return x*x*x L=[cube(x) for x in range(N) if x%2==0] - With
filterto select even numbers andmapto compute cubes:def even(x): return x%2==0 numbers=list(range(N)) even_numbers=list(filter(even, numbers)) cubes=list(map(cube,even_numbers)) - Also with
filterandmapbut defining implicitly the cube and even functions withlambdainstead ofdef:numbers=list(range(N)) even_numbers=list(filter(lambda x: x%2==0, numbers)) cubes=list(map(lambda x: x*x*x,even_numbers)) - The most compact way of solving the problem involves
lambdaand list comprehension. In the example below, one needs to indicate that the $\lambda$ function has to be applied to the variablexin the list comprehension, using(lambda x: x*x*x)(x). Otherwise, the output list would be a list of lambda functions.
cubes=[(lambda x: x*x*x)(x) for x in range(N) if x%2==0]
Further examples and exercises
Convert yields and filter high producers
# Base data: crop yields in kilograms per field
yields_kg = [8500, 12300, 6400, 10200, 7500]

# Step 1: Convert each yield to tons (1 ton = 1000 kg)
yields_tons = list(map(lambda y: y / 1000, yields_kg))

print("Yields in tons:", yields_tons)
Challenges:
- Filter only the fields with yield greater than 8 tons using
filterandlambda. - Combine
mapandfilterto first convert to tons and then keep only fields between 7 and 10 tons.
Filter suitable soil pH and tag fields
# Soil pH values for different fields
soil_ph = [5.8, 6.3, 7.0, 4.9, 6.8, 7.5]

# Step 1: Keep fields with pH between 6.0 and 7.0
suitable_ph = list(filter(lambda p: 6.0 <= p <= 7.0, soil_ph))

print("Suitable pH values:", suitable_ph)
Challenges:
- Use
mapandlambdato transform each pH value into a label:"low","ideal", or"high"based on simple thresholds. - Create a list of tuples
(pH, is_suitable)whereis_suitableis a Boolean from alambdapassed tomap.
Predict yield growth and flag underperformers
# Yields in tons this year for several fields
current_yields = [8.5, 6.0, 9.2, 5.5, 7.8]

# Step 1: Project next year with 5% growth
next_year_yields = list(map(lambda y: round(y * 1.05, 2), current_yields))

print("Projected yields:", next_year_yields)
Challenges:
- Use
filterto select fields whose projected yield is still below 7 tons, marking them for improvement. - Use
mapto build a list of strings like"Field 1: 8.93 tons"based on the projected yields.
Filter crops needing irrigation and scale irrigation amount
# Average rainfall (mm) received by each crop type
rainfall = [520, 680, 450, 800, 390, 710]

# Step 1: Crops that need irrigation (rainfall < 500 mm)
needs_irrigation = list(filter(lambda r: r < 500, rainfall))

print("Rainfall for crops needing irrigation:", needs_irrigation)
Challenges:
- Assume each crop needs at least 600 mm total; use
maponneeds_irrigationto compute how much extra water (in mm) each crop requires.
Compute productivity and select top fields (example of use of zip)
# Yields in tons and corresponding areas in hectares
yields = [8.5, 9.1, 6.3, 10.0]
areas = [2.0, 2.5, 1.8, 3.0]

# Step 1: Productivity = yield / area (tons per hectare)
productivity = list(map(lambda y_a: round(y_a[^0] / y_a[^1], 2), zip(yields, areas)))

print("Productivity (tons/ha):", productivity)
Challenges:
- Use
filterto keep only fields with productivity above 3.5 tons/ha. - Use
mapwithzipto generate a list like("Field 1", productivity_value)and thenfilterto keep only “high productivity” fields.
Class 13 (December 12, 2025): Introduction to IoT with Raspberry Pi
Video suggestion: Raspberry Pi for beginners
We will use Python to control physical devices through GPIO (general-purpose input/output) ports on a Raspberry Pi microcomputer. We will rely on the gpiozero Python package https://gpiozero.readthedocs.io/en/latest/recipes.html.
Topics of the class:
- Raspberry Pi (RPi) and PiOS (Linux)
- Retrieve local address of the Raspberry Pi with
hostname -I. To do this, open a terminal on RPi and typehostname -Ito retrieve the IP address. Also, type in the terminalwhoiamto retrieve the username, say ‘pi’. - Accessing RPi remotely with
ssh(secure shell) - Connecting RPi to a breadboard using the gpio pins
- Using the nano text editor to create scripts
- Running scripts in RPi with
sudo python3 test.py - Implementing some basic recipes from
gpio zerodocumentation that use the following physical devices: leds, buttons, and a line sensor
To start (access RPi from local network):
- You need: RPi username, say ‘pi’; RPi password; and the RPi IP address, say ‘10.17.99.160’
- Access RPi with
ssh: open terminal (CRTL+R and typecmdin Windows) and at the terminal prompt$type smth like$ssh pi@10.17.99.160(replace by actual username and IP address). You will be prompted for the RPi password. - Since all the class has access to the RPi, it is important that you only work on your own working directory. So, the next step is to create it: change directory with
$cd Documents/testsand create your temp directory with, say,$mkdir bob(replace by your own name). The full path to your own working directory should be smth like~/Documents/tests/bob - Go to your directory with
$cd bob. - To create a new Python script (or to edit an existing one) type
$nano test.py - Inside the file type
print('hello') - Save contents with
CTRL-X - Type on terminal
$sudo python3 test.pyto execute the file. This should printhelloin the terminal. So, you have run a Python script in a Raspberry Pi.
Exercises with Raspberry Pi, breadboard, leds, button and connection wires:
- Blink LED. To determine what is the resistor to use for different types of leds, check (https://www.hobby-hour.com/electronics/ledcalc.php): recall that the RPi voltage at the GPIO pins is 3.3 v.
- Check if button is pressed
- Button controlled LED
- Reaction game
- LED board
Additional exercises for led board with gpiozero
-
LED_board. Interpret the code and verify that it is behaving as expected.
-
Look at the advanced recipes for LEDboard. Create a “pyramid” of lights 5-3-1-3-5, that turn on and off and pause 1 second. You can build a loop such that the pyramid runs only 4 times and the execution stops.
Class 14 (December 19, 2025): Introduction to IoT with Raspberry Pi (cont'd)
There are many hardware adapters that make it easier to connect sensors to a microcomputer. Here we look at the Raspberry Pi hat included in the Grove_Base_Kit_for_Raspberry_Pi. The Grove Base Hat for Raspberry Pi provides Digital/Analog/I2C/PWM/UART ports to the RPi allowing it to be connected a large range of modules.
The following code show how to access a temperature and humidity sensor readings programmatically. The sensor is connected to digital port D5. This code also allows access to gpio pin 17 to power a LED. You can find a picture of the circuit here.
import time
from seeed_dht import DHT
from gpiozero import LED

led=LED(17)
# Grove - Temperature&Humidity Sensor connected to port D5
sensor = DHT('11', 5)
while True:
    humi, temp = sensor.read()
    print('temperature {}C, humidity {}%'.format(temp, humi))
    if humi > 85:
        led.on()
    else:
        led.off()
    time.sleep(0.5)
Exercises
- Adapt the code above such that the LED is on when the temperature is above 24 Celsius or below 20 and is off otherwise.
- Consider the circuit pictured here that uses an ultrasonic ranger (range of 0-4 m). Interpret the code below.
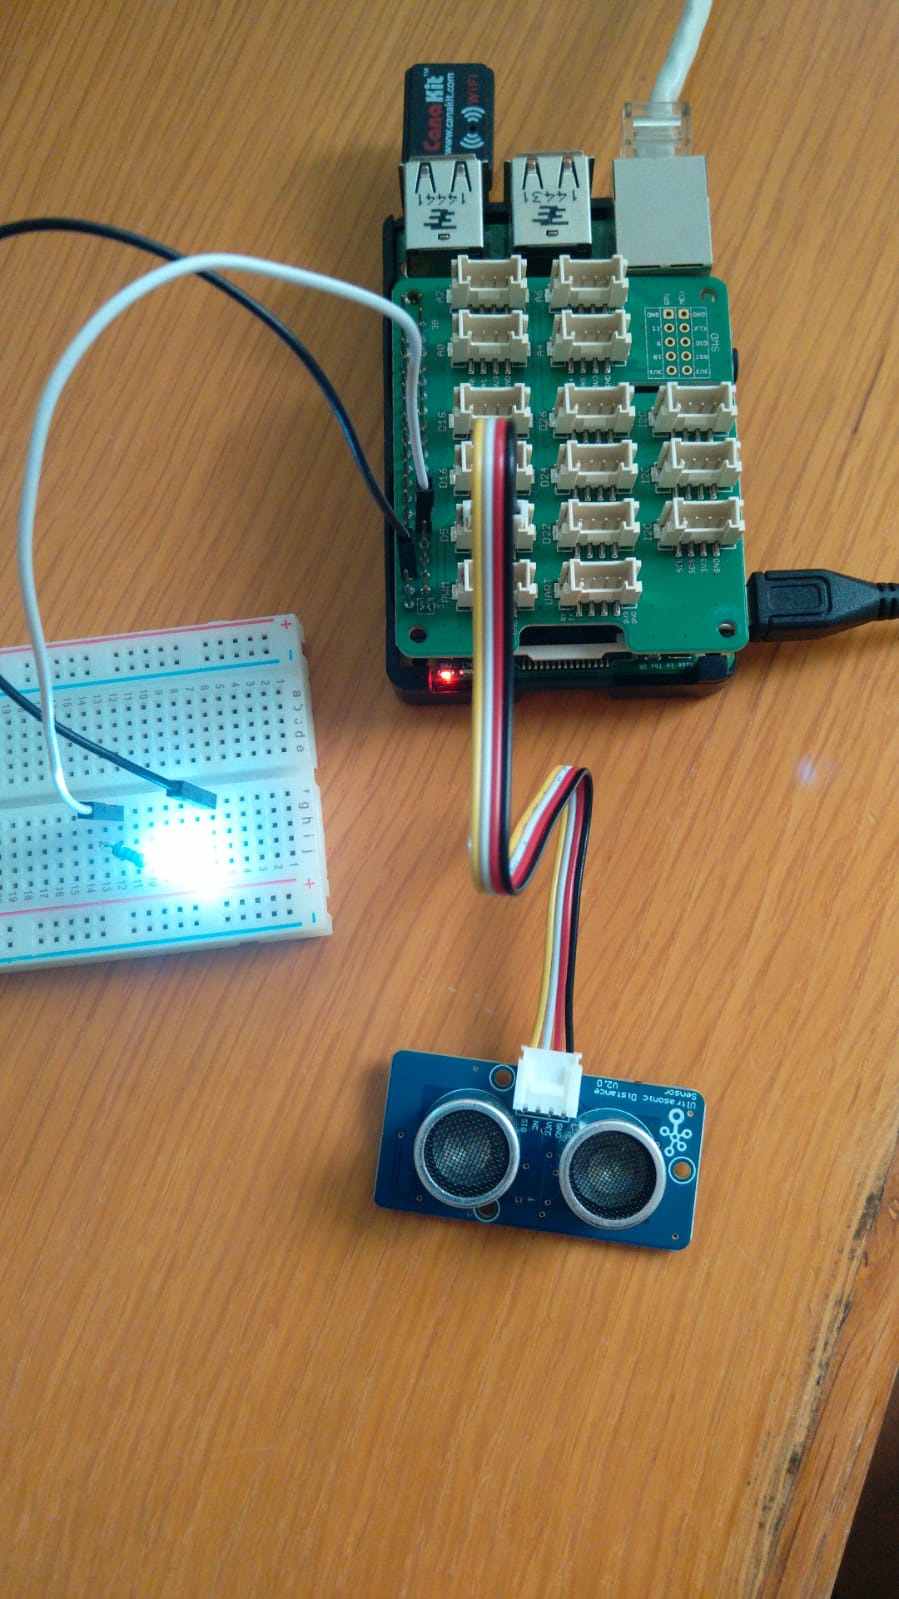
import time
from grove.grove_ultrasonic_ranger import GroveUltrasonicRanger
from gpiozero import LED
led=LED(17)
# Grove - Ultrasonic Ranger connected to port D5
# resolution: 1 cm; range: 0-4 m
sensor = GroveUltrasonicRanger(5)
while True:
    distance = sensor.get_distance()
    print('{} cm'.format(distance))
    if distance < 20:
         led.on()
         print('LED on')
         time.sleep(0.5)
         led.off()
         print('LED off')
         continue
    time.sleep(1)
- Create a new script that combines the temperature/humidity sensor with the ultrasonic ranger sensor and the LED.